RESTORATION
Bringing New Life into an Old Amplifier
Desert Amplifier Repair specializes in circuit restoration work for all vintage amplifiers. Our long-standing relationship to a vast network of parts suppliers and surplus parts depots ensures DAR can track down almost any part. This allows your vintage amplifier to maintain its value at top dollar. At DAR we understand that in some instances it’s not necessary to use OEM parts, or it’s not desired. For example, electrolytic capacitors (commonly called filter caps) have a shelf life of roughly 10 years, so it is expected that they will be replaced with a new component during the amplifier’s lifespan. However, before DAR just starts replacing parts because someone said it was probably time, we thoroughly check and test each capacitor, starting with an in-circuit capacitor tester/ESR meter.

If a capacitor tests low or questionable and does not show visual signs of leakage, then DAR will remove it from the circuit and test it again at actual operating voltage and OEM test specifications on our Sencore LC102 capacitor-inductor analyzer. If the capacitor is found to be weak or failed, as long as the capacitor replacement is of good audio quality this should not negatively effect the value of a vintage amplifier. In addition to capacitors we also test and restore the other components. We do our best to keep as many properly working parts as possible, especially tone caps and transformers.
A typical restoration starts with testing tubes on the Amplitrex AT1000. After we gain access to the inside of the chassis we check the filter capacitors, clean/lubricate the potentiometers, switches, jacks, tube sockets, tension the tube sockets, meter the grounds for impedance, and trace the wires for continuity against the schematic. Once we have verified the amplifier’s current state and corrected anything that’s found to be incorrect, we power it up using a custom Variac to meter for amperage draw and form the new/old components to prevent shocking them with a sudden surge of voltage and risk blowing the fuse in the event something is not right. The bias is monitored and, if necessary, adjusted once at operating voltage. Voltage readings are taken and compared to the schematic, if anything is off, additional components are tested and replaced as needed to achieve full functionality. The circuit is tested again for faults and tone before starting the voicing process and final biasing.
During the process of restoring a vintage amplifier it’s common to replace it’s two-prong power cord with a three-prong earth-grounded power cord and bypass the ground switch. As a safety feature, the new power cord ground is wired to the chassis to prevent voltage from traveling through the audio ground and the player being shocked. An added benefit is that in most cases this will also lower the noise floor 60Hz hum from the circuit. 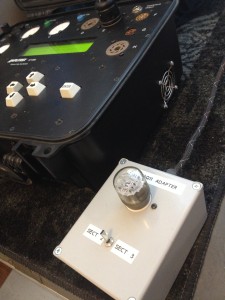
One of the niche restorations DAR has become known for is the Ampeg V series amplifiers, made famous by the Rolling Stones, now a must-have backline for stoner rock. These amps were built like tanks, so they often went unserviced for decades. By the time they give up, they usually need a serious overhaul. Having worked on over three dozen of these V4(b)/VT22/VT40’s, early on we had Amplitrex build a custom jig and test set for the difficult to test three-sided 6K11 tube.
Whether it’s an amplifier that’s made hundreds of hit records in the studio, a touring workhorse, a weekend warrior, a bedroom jam amp, or found in the attic after 60 years, we can bring it back to sounding as good as the day it was made, and oftentimes even better!
Enjoy the restoration video of a Fender ’64 Bandmaster below, as well as a few before and after pics to see what Desert Amplifier Repair can do for your amplifier. Check out our projects page to see some recent equipment that has crossed the bench, or take a look at our Facebook page to see what we’re working on right now.